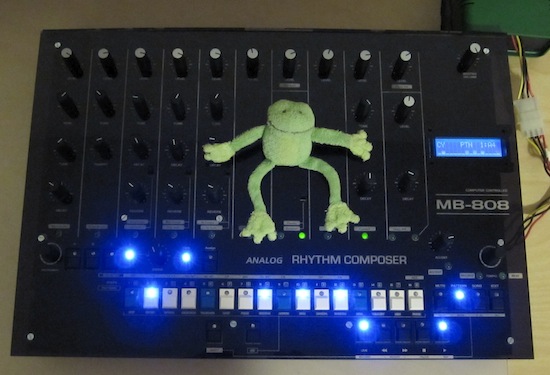
MIDIbox 808 is a variant of MIDIbox SEQ V3 and is mainly intended as drum sequencer for Jeff Farr's MB808 project. But it is possible to use the firmware for other "analog drums" projects as well, or as MIDI drum sequencer.
Minimal (=inexpensive) control surface with 33 buttons, 35 LEDs and 1 rotary encoder. Additional control elements (e.g. 4x16 Button/Duo-LED matrix, Instrument selection encoder, BPM LED digit display, 2x16 LCD or two 2x40 LCD, etc...) are supported as well, but they are not required to experience the full potential of the firmware!
Patterns are stored in a new (incompatible!) data structure, optimized for 16 drum tracks with up to 64 steps and 2 layers (gate/auxiliary)
A pattern is divided into 4 sections (A/B/C/D), which can be used for variations.
The auxiliary layer can be used to trigger one of following functions: skip step, Flam, random gate, random flam, Accent (for external instruments), Step Microdelay (to add manual shuffling) + placeholders for future extensions
One track can be optionally used as global accent (requirement for MB808 drums). Note that this accent layer has it's own time base and step progression!!!
Simple to use chain pattern function (alternative to song mode)
Live recording function allows to record all 16 instruments in one run, controlled from the GP buttons, or from an external MIDI device (drum pads or MIDI keyboard). The MIDI solution has the advantage, that the auxiliary trigger layer (e.g. accent or flam) can be controlled with the velocity of MIDI Note events.
Sequencer can be perfectly synched to MIDIbox SEQ V3 or similar sequencer/groove boxes/recording software, either as MIDI clock master or slave. A DIN synch output for clocking vintage gear (e.g. original TR-808, TR-909, TB-303, etc...) is provided as well. A DIN synch input is not provided!
It is possible to run the firmware on the original MIDIbox SEQ V3 hardware, but not all control elements will be used. The 16 GP rotary encoders are used to select the instrument (they don't change values), the two 2x40 LCD will be enabled to show the correlating button functions, but the messages won't be so selfexplaining like known from MBSEQ (many abbreviations...) to allow easy re-use between 2x40 and 2x80 output functions.
In other words: the option to install MIDIbox 808 firmware on MIDIbox SEQ V3 is provided for people who want to evaluate this alternative solution, or just want to spend some nice hours with a dedicated drum sequencer. BankSticks won't be re-formatted while switching the firmware - but because of the changed data structure, patterns will output "random data" when played with a different firmware!
1 rotary encoder (for tempo, could also be used for additonal purposes in future)
33 buttons
35 LEDs (33 could be integrated into buttons, 2 additional LEDs to display selected layer and record mode)
Optional Hardware
An "Instrument selection" encoder as alternative possibility to select a single track, or all tracks together.
A "swing" pot, which controls the "groove intensity" with a higher resolution (in groove layer, only 3bit = 8 values selectable). This pot is already part of MB808 PCB.
Button/LED functions, that are located in the SHIFT or ALT layer, can be assigned to dedicated buttons/LEDs (e.g. Record, Pause, ALL, Solo, etc...)
2x16 LCD for better overview over selected mode, edited steps, pattern, song position, etc... Some nice animations (e.g. in mute page: meters which visualize the track activity) are provided as well :)
or two 2x40 LCDs to show the correlated GP button functions depending on the selected page.
3 LED digits for BPM display (requires two additional 74HC595 shift registers)
4x16 Button/Duo-LED matrix (Pinning of Button/Duo-LED matrix(Note: circuit needs to be improved for high-current LEDs!))
It will be possible to edit 4 tracks at once, or a single track in 64 step view!
Matrix can either be used in addition to the 16 GP buttons/LEDs, or the upper row of the matrix replaces the GP functions.
MBHP_AOUT, MBHP_AOUT_LC or MBHP_AOUT_NG to output velocity. Please note, that each track has only two velocity values defined (accented and not accented). It isn't possible to set individual velocities for each step.
Button Functions
When you look on the Frontpanel again, you will notice a SHIFT and ALT button. They are used to select different button layers, labeled with red and green font. It would be possible to combine SHIFT+ALT to a new layer in future.
Please note, that the frontpanel labeling is not intended "for production", but only to visualize the layers. The final frontpanel has to be discussed in the MB808 forum.
Menu Page Selection
By pressing the ALT button, the GP LEDs will display the currently selected menu page. The page can be changed by pressing the appr. GP button above the green labels.
Page
Functions
Edit
Same as EDIT button - only available as additional way to select the edit page.
Util(ity)
Copy Track
Paste Track
Clear Track
-
Copy Steps
Paste Steps
Clear Steps
-
Undo
Clear Pattern
-
-
-
-
-
MuteAll
UnMute All
Opt(ions)
Oneshot Pattern Chains
Follow Pattern/Song (default)
Synch Section Changes to Measure
Synch Pattern Changes to Measure
-
-
-
-
Send Pattern changes via MIDI CC
Send Song changes via MIDI CC
Send Mute changes via MIDI CC
-
-
-
-
-
Dir(ection)
Forward (default)
Backward
PingPong
Pendulum
Rand.Dir
Rand.Step
Rand.D+S
-
-
-
-
-
-
-
-
-
Timeb(ase)
1
1T
2
2T
4
4T
8
8T
16 (default)
16T
32
32T
64
Odd
Extreme Odd
Restart Track on each Bar (Measure)
Prog(ression)
Fwd 1 (default)
Fwd 2
Fwd 3
Fwd 4
Fwd 5
Fwd 6
Fwd 7
Fwd 8
Back 0 (default)
Back 1
Back 2
Back 3
Back 4
Back 5
Back 6
Back 7
Loop
Allows to set the loop points of a step.
There is a loop and end point. The loop point defines where the pattern should continue after the end point has been played (in other words: the end point defines the track length)
The GP LEDs show the steps between these points.
If you select a GP button right of the loop point, the end point will be changed.
If you select a GP button left of the loop point, or if you press the SHIFT button, the loop point will be changed.
Note that the track length can be set between 17 and 32 steps by setting the end point in section B. By doing so, section AB and CD will be combined to single section.
A track length of more than 32 steps requires an end point at section C or E. By doing so, ABCD will be combined, and there are no separately selectable sections anymore. Hint: activate the "All function" (SHIFT+Edit button) to change the lengh of all tracks at once!
Groove
Off
Shuffle (default)
Inv. Shuffle
Shuffle 2
Inv. Shuffle 2
Shuffle 3
Shuffle 4
Shuffle 5
Intensity 0 (default)
Intensity 1
Intensity 2
Intensity 3
Intensity 4
Intensity 5
Intensity 6
Intensity 7
Assign
Accent
Skip Step
Flam 1 (default)
Flam 2
Flam 3
Flam 4
Random Gate
Random Flam
MicroDelay 1
MicroDelay 2
MicroDelay 3
MicroDelay 4
-
-
-
-
SPM
2
4
6
8
10
12
14
16
18
20
22
24
26
28
30
32
In song/chain mode, the SPM (Steps per Measure) value defines, after how many steps the next pattern is selected.
Manual
If sequencer playing: position of all tracks will be set to the selected step.
Sequencer not playing: triggers the step of the selected instrument
Rand(om)
16 GP buttons used for obscure random options.
Note that it also works with multiple selected tracks.
E.g., select LT/MT/HT tracks, and randomize them - it rocks! :-)
BPM
Master
Slave
Auto (default)
-
-
-
-
-
Int 1:1 (default)
Int 1:2
Int 1:4
Int 1:8
Ext 1:1
Ext 1:2
Ext 1:4 (default)
Ext 1:8
Vel
SHIFT button not pressed: velocity unaccented steps
SHIFT button pressed: velocity of accented steps.
MIDI
SHIFT button not pressed: select a MIDI note with the 12 leftmost buttons, and the octave (1/2/3/4) with the 4 rightmost buttons.
SHIFT button pressed: assign MIDI channel
SysEx
Allows to send a SysEx dump of current pattern or whole Bank for embedding into a DAW based project. The button number correlates to the device ID of the dump.
Mode Selection
Mute: mute/unmute tracks
SHIFT+Mute: solo (only) the selected track(s)
Pattern: enters pattern selection page: GP buttons select one of 64 patterns within the current bank
The left side of the GP buttons select the pattern section: A/B/C/D/E/F/G/H
The right side selects the actual pattern within the section, e.g. A1, A2, A3, ... A8.
The sequencer will only change to a new pattern if you press one of the right side GP buttons (so that you can change to a new section or bank without disturbing the currently played sequence).
Pressing multiple buttons allow non-destructive changes (e.g. press 1: A1 will be played. Press 2 in addition: A2 will be played. Release 2: A1 will be played again. Release 1: A1 still be played)
SHIFT+Pattern: enters bank selection page: the GP buttons select one of 16 banks. A 64k BankStick can store 2 Banks (-> 128 patterns), which are called "Upper" and "Lower" bank, and print on the display with capital or lower case letter (A1: pattern in upper bank, a1: pattern in lower bank).
A 32k BankStick can only store a single Bank (-> 64 patterns)
A Bank change won't take place immediately - you have to enter a new pattern number in the PATTERN page so the bank will be changed.
ALT+Pattern: store pattern page: The target location has to be entered the same way as descriped above: select the section (A/B/C/D/E/F/G/H) with the left GP buttons, and the target location (1/2/3/4/5/6/7/8) with the right GP buttons. The bank can be pre-selected with "SHIFT+Pattern" if desired, otherwise the current bank will be used.
After the store operation, the sequencer will switch back to the pattern selection page to ensure, that you don't accidently overwrite multiple patterns.
Song: restore pattern chain A1..H8. Up to 64 chains can be stored in a separate "Song" BankStick), same selection method as in pattern page. If no "Song" BankStick is connected, all LEDs will flash to inform you about this state (no Chain store/restore possible).
The CS configuration of this BankStick can be changed in the setup_*.asm file. By default it's CS=3
SHIFT+Song: store current pattern chain in slot A1..H8
Edit: track editing mode
HOLD Edit: direct selection of track(s) - see next chapter
SHIFT+Edit: activates/deactivates "change all" function - changes will take place on all 16 tracks when activated
Gate: selects gate layer for editing
Aux: selects auxiliary layer for editing
Gate+Aux: selects both layers for editing (button will cycle between Gate On, Gate+Aux On, Gate+Aux Off)
SHIFT+Gate: temporary forces accent on all selected tracks (+the global accent trigger)
SHIFT+Aux: temporary forces the aux trigger on all selected tracks
Entering a pattern chain
The pattern selection page provides a chain function, which allows you to enter a chain of pattern changes. The chain will be automatically looped until a single pattern is entered without pressing the SHIFT button, or it will be processed only once (and not loop) if the "oneshot" option is enabled in ALT-Options menu.
Usage example:
press PATTERN button
press&hold SHIFT button
press GP button #9, B1 will be added to the chain
press GP button #9 again, a second B1 will be added to the chain
press GP button #10, B2 will be added to the chain
press GP button #11, B3 will be added to the chain
the sequencer has already started to process the chain. It switches to the next pattern after each 16 steps (one bar)
release SHIFT button
note that you can always add patterns to the chain by pressing&holding SHIFT again. A chain consist of up to 128 pattern changes.
exit chain mode by selecting a pattern w/o pressing SHIFT button.
The chain will be automatically cleared in oneshot mode, after the last pattern has been selected.
Note: Up to 64 pattern chains can be stored in the "Save Song" page (SHIFT+Song), and restored in the Song page (Song button). This function requires an additional BankStick
Track selection
Tracks can be selected the following ways:
Inst Encoder: allows you to select a single track quickly. The track will be displayed by the GP LEDs for a short moment.
The last position of the encoder activates all tracks together. This is especially useful, when global changes should be made (e.g. selecting groove mode)
Press&Hold Edit button: alternatively, one or more tracks can be selected with the GP buttons so long the edit button is pressed.
Especially the multi selection is very useful, because they allow changes on the OH/CH or LT/MT/HT track parameters at the same time (especially important when timebase or progression is modified while sequencer is running)
Live play mode: if live play mode is activated, the last "tapped" track will be automatically selected. This allows you to quickly search for the track of a certain instrument (you will hear it while tapping the GP button...)
A/B/C/D buttons and LEDs
A: play and edit step 1-16
B: play and edit step 17-32
C: play and edit step 33-48
D: play and edit step 49-64
Multiselection: press more than one button to combine sections to a chain. E.g., if A+C+D are pressed, the pattern will be looped between A, C and D section, until you press a single button again.
The LEDs of the step selection buttons have two functions:
lit solid to notify the section(s) which is/are played
the LED of the currently played section flashes synchronously to the beat
By pressing SHIFT+Section button, it is possible to edit a section, while the sequencer plays another one (e.g. edit B, while section A is played).
Please note: if the track length is >16 steps, AB and CD section will be automatically combined. If track length is >32 steps, ABCD will be combined.
Transport
Live: enables/disables live play mode, which allows you to trigger the drums manually with the GP buttons.
Record (SHIFT+Live): activates live recording function. Tracks can either be recorded by tapping the GP buttons (live play mode has to be enabled in addition), or from an external MIDI device (keyboard, drum pads, ...)
Rew: Pattern mode: switch back 4 steps synchronously (nudge).
Chain mode: switch to previous pattern
Fwd: Pattern mode: switch forward 4 steps synchronously (nudge).
Chain mode: switch to next pattern
Rotate <>: (SHIFT+Rew/Fwd) rotates (scrolls) the selected track(s) to left/right direction between the given loop points (!) and within the selected step view (if step 1-16 or 17-32 selected: rotate between A loop points, if step 33-48 or 49-64 selected: rotate between B loop points). This function is especially useful after a random pattern has been generated.
Stop: stop sequencer
Pause (SHIFT+Stop): pauses sequencer
Play: start sequencer. Pattern/Song will be restarted if button is pressed while sequencer already playing (same behaviour as known from Logic Audio)
Tap (SHIFT+Play): "tap tempo" function: tap it at least four times to define the BPM tempo
If the sequencer is currently stopped, it will start automatically with the 5th tap
Encoder/Pot Functions
Inst(rument) Encoder: allows to select the track that should be edited. While this encoder is moved, one of 16 GP LEDs will flash for a short time to notify the selected track. The last position of the encoder activates all tracks together. This is especially useful, when global changes should be made (e.g. selecting groove mode)
Note that alternatively one or more tracks can be selected with the GP buttons while EDIT button is pressed&held - accordingly, this encoder is only an optional feature (I must admit, that I only find it useful to select all tracks with a single turn).
Swing Pot: this pot (= absolute values) allows to change the "swing intensity" if one of the groove functions is activated.
Tempo: allows to change the BPM
Mapped button functions of MIDIbox SEQ V3 hardware
Track 1/2/3/4 are mapped to the A/B/C/D buttons
Layer A/B are mapped to Gate/Aux layer selection buttons
Layer C is assigned to Live button
F1..F4 have no function yet (could be used for copy/paste/... later)
Exit and Menu button are mapped to ALT function.
Select button is mapped to SHIFT function.
Datawheel is mapped to tempo encoder
GP encoders are used to select a track
Current State
The firmware has reached the release candidate state. All documented functions are implemented.
Planned features for future releases:
find a button combination to activate "loop mode" when a chain is playing: holds current pattern so long function activated. Especially useful if a pattern should be edited while chain is playing (the sequencer won't switch to the next pattern so long loop function is activated)
more random generator options
alternative view on the 4x16 LED matrix to display all 64 steps of a track
Before uploading the new firmware, please update to MIOS V1.9g first if this hasn't been done yet, otherwise the Tap Tempo function and the encoders won't work.
The release package contains a prepared .hex file for MIDIbox SEQ V3 hardware (-> setup_808_mbseqv3_hardware.hex) and for the MB808 hardware (-> setup_808_default.hex or setup_808_with_swingpot.hex)
MB808 users: please note, that the data structure is not compatible to Moogah's MBSEQ V2 based version! The BankStick will be reformatted after the new firmware has been uploaded!! So, please remove the BankStick (or create a backup. If somebody is interested, I could write a pattern converter for the new format.
 Introduction
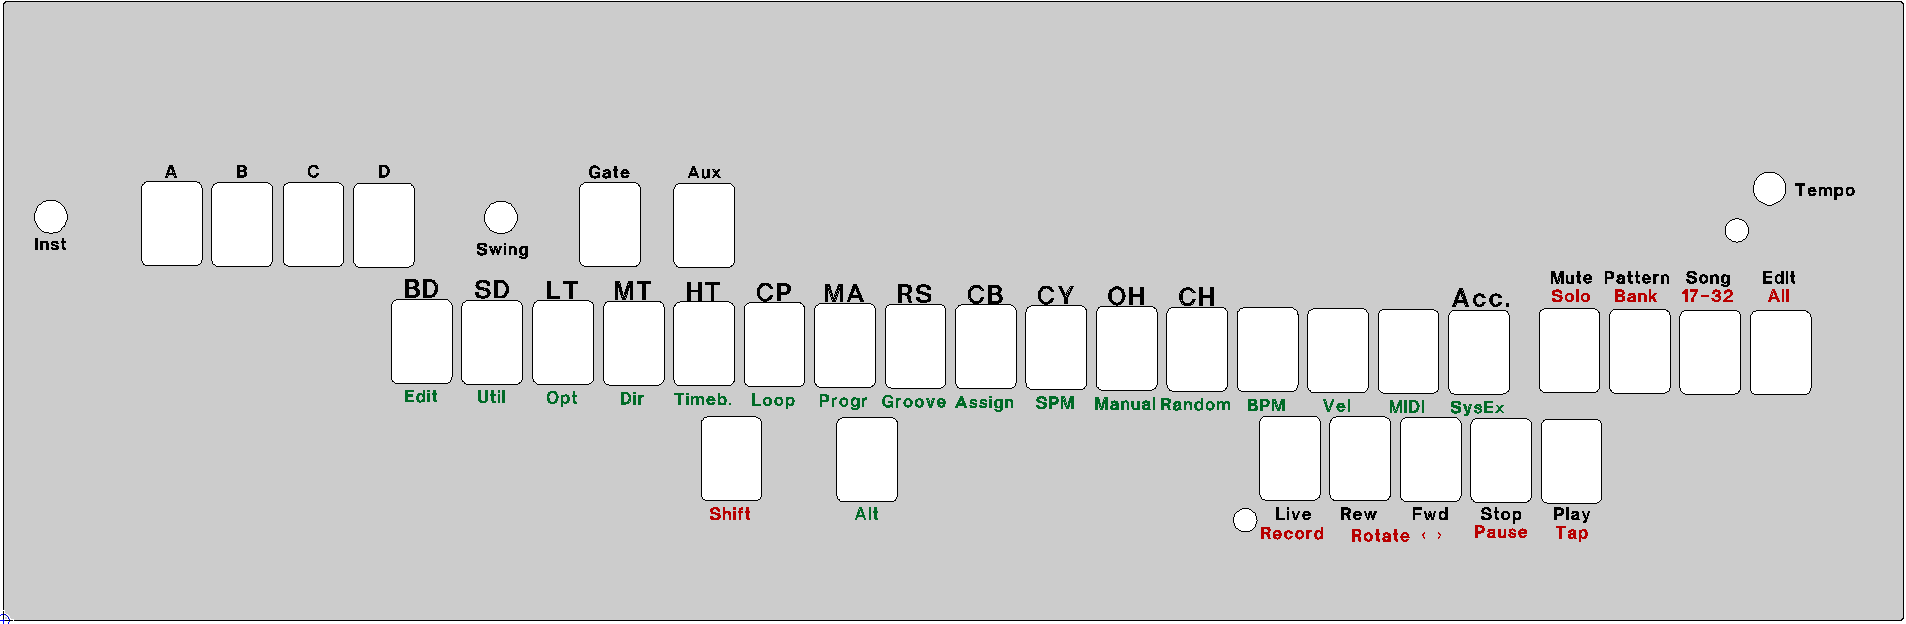
